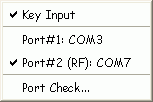
The Connection Menu features three main options: 1) Use it to specify the COM Port to which the PRS Receiver is connected, 2) use it to simulate PRS Transmitter input from the computer keyboard, and 3) use it to test both for the COM Port connection and for the receipt of a signal from a PRS Transmitter.
As part of the installation of the PRS Receiver, the COM port to which the PRS Receiver is connected must be communicated to the InterWrite PRS application. The number of COM ports displayed on the Connection Menu will vary with the number of serial ports on the computer. Click on the COM port to which the PRS Receiver is connected. If you don't know which COM port it is, or if you want to test the connection, select a COM port in the Connection Menu, click on the Port Check menu option, verify the PRS Receiver is powered-on, and send a signal from a powered-on PRS Transmitter to the PRS Receiver.
Use this Connection Menu option to 1) specify the COM Port to which the PRS Receiver is connected, 2) simulate PRS Transmitter input from the computer keyboard, and 3) test both for the COM Port connection and for the receipt of a signal from a PRS Transmitter.
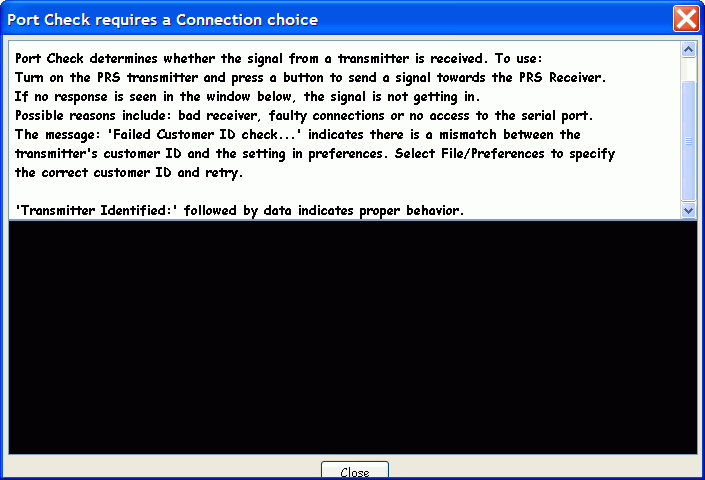
If the PRS Receiver is connected to the COM port you selected in the Connection Menu, a Transmitter Identified message will appear in the black Port Check window. If the Port Check window remains blank, select another COM port in the Connection Menu and repeat the transmission check process.
As indicated in the message box on the Port Check window, the Port Check feature verifies that a signal from a PRS Transmitter is received by the PRS Receiver. Not only can you use Port Check to verify the PRS Receiver COM port connection, you can also use it to test a PRS Transmitter. Verify the transmitter does not need new batteries. (Under normal operating conditions, the LED indicator light on a powered-on Transmitter is bright green. Change the batteries when the LED indicator light is dim.) Select the Port Check option and send a transmission by pointing the tapered end of the powered-on PRS Transmitter toward one of the PRS Receivers in the room and pressing a numbered button. If nothing shows up in the Port Check window, there is a problem with the Transmitter. Try resetting the Transmitter. Straighten a paper clip and stick the end of the paper clip into the hole on the back of the PRS Transmitter. The hole is located to the right side on the back of the Transmitter, near the battery pack. Push until you feel a slight click. Power on the Transmitter and rerun the Transmitter test.
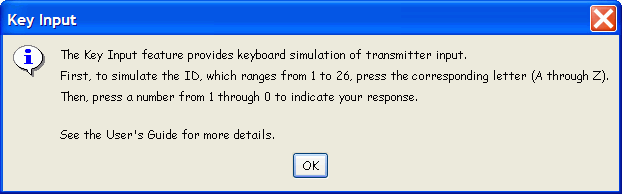
If you are learning how to use the PRS system and/or you want to simulate a Session, you can set up the InterWrite PRS application so that it accepts input from the computer keyboard that simulates PRS Transmitter input signals. When you want to test a Lesson, you can run a test Session without having a PRS Receiver connected to your computer.
1 Select the Key Input feature from the Connection Menu (it will remain checked until you select the menu option again).
2 Make sure the Response Grid (part of the Class definition) is set up with enough Response Boxes to accommodate the number of simulations you intend to use.
3 Click
on the New Session  Function Button in the Sessions
Module window.
Function Button in the Sessions
Module window.
4 Respond to a Question by first typing a letter, which identifies a unique ID (there are twenty-six unique IDs, one for each letter of the alphabet), and then typing the number of your test Response Choice.
As you enter these alpha-numeric combinations from the computer keyboard, each will register as a Response in one of the unassigned Response Boxes in the Response Grid displayed below the Question.