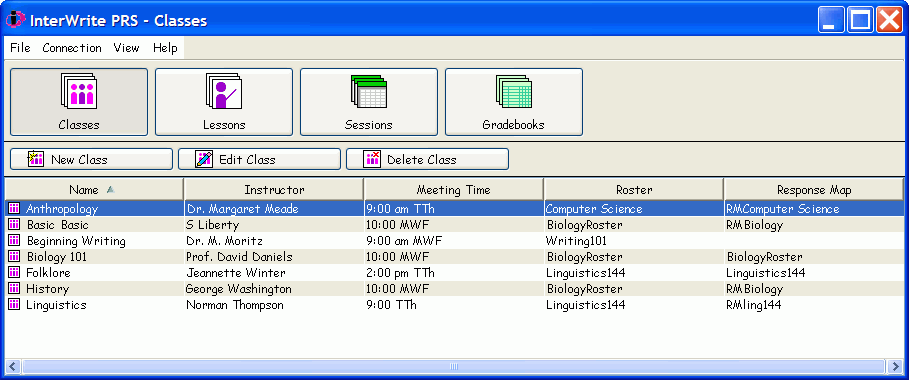
Classes is the preparatory, or setup, module wherein all aspects of the Class are defined. A Class is a group of people, an audience, who are getting together to respond electronically to Questions that test their knowledge of a subject, or poll their opinions. Each Class definition contains:
general Information about the Class – the Class's name, the instructor/presenter, section, meeting time, and Class location
a Roster of participants/students
a Response Map, which is used to assign each student a specific position in a Response Grid
default settings for the Response Window and the Results Graph Window that are displayed during a Session.
The primary function of the Classes Module is to associate a Class with a Roster and a Roster with a Response Map.
The Class Roster identifies the students in the Class and associates their names and student IDs with their PRS Transmitter ID numbers. A Roster can be created manually as part of the Class definition. The student’s name, student ID, Transmitter ID number, and other information are entered into a student profile form and added to the Roster. Or, an existing Roster can be imported into the Class definition. Rosters derived from the PRS Web Registration Application, the PRS Blackboard Registration Application (Chapter Seven in the InterWrite PRS User's Guide), or Rosters used with other Class definitions can be imported into a new Class definition.
The Class Roster can be displayed in two different ways during a Session; by means of a Response Grid, or an Attendee List.
A Response Map is
set up in the Class definition to display the Class Roster in a grid-like
format, the Response Grid.
The Response Map is a virtual seating chart, providing each student a
permanent location in the Response Grid. The usefulness of this feature
becomes apparent with larger classes.
The purpose of the InterWrite PRS
system is to capture electronically transmitted Responses to Questions
presented during a Session. Students point their PRS Transmitters toward
a PRS Receiver and press the number button that represents their Response
Choice for the Question. The LED on the Transmitter flashes while the
Transmitter is sending the signal to the Receiver. When the signal has
been processed, the student’s name or Transmitter ID number displays on
the top line in the next available Response Box in the Response Grid.
This verifies that the student’s Response to the Question has been received
and recorded. If the audience is quite large, it might be difficult for
a single student to locate his Response in the Response Grid. When a Response
Map is set up, each student has an assigned position in the Response Grid,
making it easy for him or her, as well as the instructor, to verify that
their Response was received and recorded.
The Attendee List provides a second way of displaying the Class Roster during a Session. A list of everyone in the Class Roster is displayed with each Question during a Session. When a student transmits a Response to the Question, his name is removed from the displayed Attendee List. When the Question's Countdown Timer has expired, the remaining names in the Attendee List are of those students who have not responded to the Question. An additional feature of the Attendee List provides the opportunity to create an Absentee List at the beginning of the Session. The instructor accepts the option to create an Absentee List and instructs everyone in the audience to press a button on their PRS Transmitters. Those in the Class Roster whose Transmitter IDs are not recorded as responding during this attendance survey are flagged as absent and are removed from the Attendee List when it displays during the Session. Late-comers to the Session will not be displayed in the Attendee List, but their Responses will be recorded for all the Questions they answer during the Session.
Default settings for both of these Response Display Modes are established in the New Class definition on the Response Window Defaults dialog. The default settings defined in that dialog indicate which information from the student profile you want to display to identify the individuals in the Class Roster. A button on the Session Toolbar lets you toggle between the two Display Modes.
A Results Graph is displayed after each Question. It can be manually displayed by clicking on the Display Results Graph button, or it can be set to display automatically upon the conclusion of the Question. Whether displayed automatically or manually, the Results Graph shows up in the bottom half of the Session window in place of the Response Grid or Attendee List. Using a variety of graphing options, it charts the Response distribution among the possible Response Choices. It’s a great tool in an academic environment because it makes it possible for an instructor to immediately assess the students’ level of comprehension of the material being covered. The default settings for both the Session Response Window with its display of either the Question and the Response Grid, or the Question and the Attendee List, and the Results Graph Window with its display of Response distribution are included in the New Class definition.
The Class definitions are displayed in a table in the Classes List Window. In the screen shot below, click on each of the Classes Function Buttons to learn more about their role in the Classes Module. Click here to learn about the screen elements of each Module main screen.