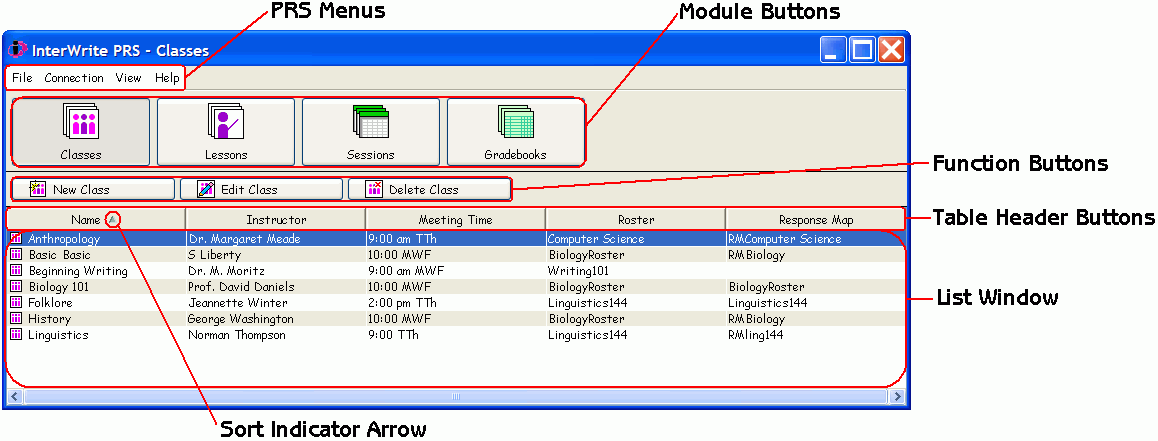
The screens of the PRS GUI provide easy access to all the functionality you will need to define your classes, create lessons, run testing and review sessions, and process and save the session results in gradebooks. The screen elements seen throughout PRS are identified in the sample Class Module main screen seen here. A definition of each screen element category follows. Click on any of the elements in the screen shot below to learn more about that particular screen element.

Menus: The PRS Menus provide options for setting Preferences (File Menu), establishing the communication link between the PRS Receiver and the PRS software (Connection Menu), offering an alternative way to move from Module to Module (View Menu), and providing additional information about using the PRS system (Help Menu).
Module Buttons: The Module Buttons identify and provide access to each of the four main Modules of PRS. Each Module represents a different set of processes that make up the PRS Audience Response System. The Class Module is where classes are defined and managed. The Lesson Module is where groups of questions are defined and organized into discrete questionnaires, or Lessons, which are stored in a Lesson Tree for easy categorization and retrieval. The Sessions Module is where a Class is associated with a Lesson and the Lesson is presented to an audience for their responses. The Gradebook Module is where the results from a Session are accumulated, marked and stored in Gradebooks.
Function Buttons: Function Buttons provide access to the features and operations of the particular Module in which they appear. The Function Button label provides a description of the operation to be performed when you click on it. The operation may be a multi-step process, such as defining a New Class, or it can be as simple as ending the current Session and returning to the Session Module main screen. Throughout this Help file, you can click on the Function Buttons in the screen shots to display details about the function and how it works.
Table Header Buttons: Each column in the table in the List Window has a labelled Table Header Button. The contents of the table can be indexed by the entries in any one of the columns in the table. Simply click on the Table Header Button of the column by which you want the table to be sorted. A Sort Indicator Arrow will appear in the Table Header you've clicked on to index the table. The Sort Indicator Arrow is a toggle that you can click on to sort the contents of the table in ascending (the default) or descending order.
List Window: The work product of the operation identified in the Title Bar of the dialog is displayed in the form of a table in the dialog's List Window. Shaded bars highlight alternating rows of the table to make it easier to read.