Click on the Create Response Map Function Button to display the following Response Map dialog.

You have three options: Use Roster, Random via Responses, or Sequential via Responses. The Use Roster option allows you to create a Response Map directly from the Roster associated with this Class definition. The order of assignment in the Response Map is based on the order in which the students are listed in the Roster. When you select this option and click on the Next button, the Response Map List Window is populated with information extracted from the Roster, the Rows and Columns fields are automatically calculated based on the size of the Roster, and the ResponseMap directory displays. Name the new Response Map and save it. The name and path to the newly created Response Map are displayed in the Response Map field above the Response Map List Window.
Both the Sequential via Responses option and the Random via Responses option require the registration of the PRS Transmitters. Sequential registration allows you to register students in the Response Map in a specific order, while Random registration assigns the next position in the Response Map to the next signal received. The end result of the three types of Response Map creation is the same; each student occupies a specific, assigned position on the Response Map, which is used to define the Response Grid.
Select either the Sequential or Random response option and click on the Next button. The Response Map Row/Column prompt displays.

Use this option to describe how you want the individual Response Boxes arranged in the Response Grid. (Remember to account for additional registrations by adding extra Response Boxes to the Response Map definition, if Class size is likely to fluctuate.) Enter the numbers of rows and columns you want in the Response Map and click on the Next button.
The following screen shot shows a portion of the screen that displays for a Sequential Response Map.

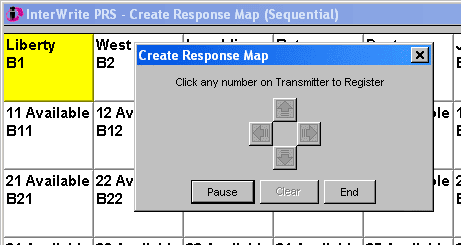
The yellow Assignment Block moves from one Response Box to the next in order across the Response Map. When a signal is sent from a PRS Transmitter, its Transmitter ID is registered to the Response Box with the yellow block in it. If a Transmitter ID is not assigned to the Response Box you want it to be in, click on the Pause button. The following view displays:

Use the green arrow buttons to reposition the yellow Assignment Block. Click on the Clear button to remove the Transmitter ID from the Response Box with the yellow block. Click on the Resume button to activate the yellow Assignment Block and register the correct Transmitter ID to that Response Box.
Click on the End button when all Response Box assignments have been made. When you click on the End button to indicate the Response Map Sequential Registration process is finished, you will be prompted to name and save the Response Map in the ResponseMap directory.
Random Response Maps provide assigned locations, but they are in no particular order of assignment. The Response Map grid displays, but there is no yellow Assignment Block. Simply have each student press a button on his or her PRS Transmitter, one after the other. The studentís Transmitter ID will display in the Response Box to which the student is now assigned. When the Response Map Random Registration process is finished, you will be prompted to name and save the Response Map in the ResponseMap directory.