Work - Energy Theorem: W = [Delta]E
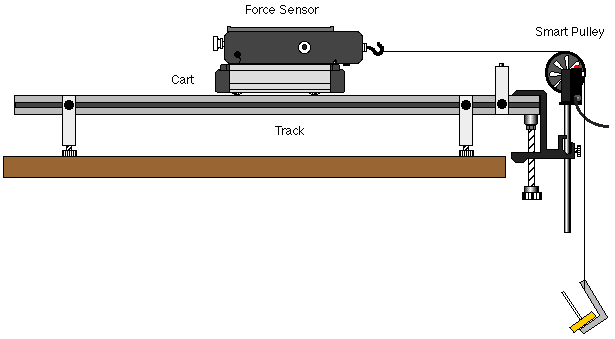
(Force Sensor, Smart Pulley)
Concept: energy
Time: 45 m
SW Interface: 700
Macintosh® file: P22 Work-Energy Theorem
Windows® file: P22_WORK.SWS
EQUIPMENT NEEDED
- Science Workshop Interface
- end-stop, track
- +/-50 Newton force sensor
- mass hanger and mass set
- Smart Pulley
- rod
- adjustable feet, track (two)
- string
- balance for measuring mass
- table clamp (for Smart Pulley)
- dynamics cart with mass bar
- track, 1.2 meter
PURPOSE
The purpose of this laboratory activity is to measure the work done on
an object and the change in kinetic energy of the object.
THEORY
For an object with mass m that experiences a net force Fnet
over a distance d that is parallel to the net force, the work
done is:

If the work changes the object's vertical position, the object's gravitational
potential energy changes. However, if the work changes only the object's
speed, the object's kinetic energy changes as follows:

where W is the work, vf is the final speed of the object
and vi is the initial speed of the object.
PROCEDURE
For this activity, the force sensor measures the force applied to the
cart by a string that is suspended over a pulley with an object of known
mass at the end of the string. The Smart Pulley measures the motion of a
cart as it is pulled. The Science Workshop program displays the force
applied, and the distance and speed of the object. The program integrates
the area under a curve of force versus distance to determine the work done.
The program calculates the final kinetic energy. The final kinetic energy
is compared to the work done.
PART I: Computer Setup
- Connect the Science Workshop interface to the computer, turn on the
interface, and turn on the computer.
- Connect the force sensor's DIN plug into Analog Channel A of the interface.
Connect the Smart Pulley's stereo phone plug into Digital Channel 1.
- Open the Science Workshop document "P22 Work-Energy Theorem"
located in your handout folder. The document will open with a Graph display
of Force (Newtons) and Distance (m), and a Table display of Speed (m/sec).
The Experiment Setup window has been resized. If you want to expand the
Experiment Setup window to its original size, click on the "Zoom"
box in the upper right hand corner of the window. (Note: To bring a display
to the top, click on its window or select the name of the display from
the list at the end of the Display menu.)
- The "Sampling Options..." are: Periodic Samples = Fast at
50 Hz and Digital Timing = 10000 Hz.
PART II: Equipment Setup and Sensor Calibration
Equipment Setup
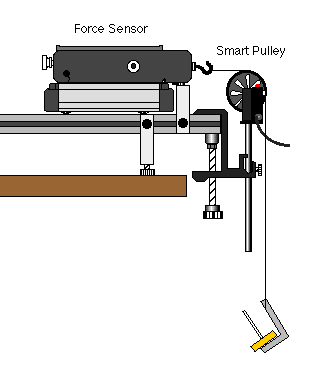
- Use a #0 Phillips head screwdriver to mount the force sensor onto the
accessory tray of the cart .
- Measure the mass of the cart plus force sensor (in kilograms), and
record the value in the Data Table.
- Put adjustable feet on both ends of the 1.2 meter track and place the
track on a horizontal surface (such as a table). Put the cart near the
middle of the track and level the track by raising or lowering one end
so the cart will not roll one way or the other.
- Put one end-stop at the right end of the track. Place the cart next
to the end stop.
- Put a table clamp on the end of the track. Mount the Smart Pulley's
rod in the table clamp so that top edge of the pulley is approximately
the same height as the hook on the force sensor that is mounted on the
cart.
- Use a piece of string that is about 10 centimeters longer than the
distance from the top of the Smart Pulley to the floor. Connect one end
of a string to the sensor's hook. Place the string in the Smart Pulley's
groove.
- Attach an object of known mass to the end of the string so that the
bottom of the object is just above the floor when the end of the cart is
against the end-stop.

Sensor Calibration
- You do not need to calibrate the Smart Pulley.
- To calibrate the force sensor, change the Experiment Setup window to
full size by clicking on the "Zoom" box or the Restore button
in the upper right hand corner of that window.
- In the Experiment Setup window, double-click on the force sensor's
icon to open the Force Sensor setup window. The Force Sensor setup window
shows the default calibration values (50 Newtons produces 8 Volts, -50
Newtons produces -8 Volts). The force sensor is set up so that a pull away
from the sensor is a `negative' force. For example, if a one kilogram object
is hung vertically from the hook, the force sensor measures -9.8 Newtons
(since the force is downward).
- Disconnect the string from the sensor's hook. (You can attach the string
to the peg on the top of the end stop.)
- For the "High Value" calibration point, press the tare button
on the side of the force sensor to zero the sensor. Click the "Read"
button for "High Value". Since there is no object on the sensor's
hook, type "0" as the "High Value".
- For the Low Value calibration, re-connect the string that is holding
the object of known mass to the sensor's hook.

- Click the "Read" button for "Low Value". Enter
the object's weight in Newtons (mass in kilogram x 9.8 N/kg).
- Remember, enter the object's weight as a negative value (a force pulling
away from the sensor).
- In this example, the object has a mass of 549.5 grams (0.5495 kg),
or a weight of 5.385 Newtons (entered as "-5.385").
- Click "OK" to return to the Experiment Setup window.
PART III: Data Recording
- Pull the cart away from the Smart Pulley so the object on the end of
the string is just below the Smart Pulley.
- Turn the pulley so the beam of the Smart Pulley photogate is not blocked
(the light-emitting diode or LED on top of the photogate is not lit).
- Click the "REC" button to begin data recording.
- Release the cart so that it can move toward the Smart Pulley.
- Click the "STOP" button to end data recording just before
the cart reaches the end stop. "Run #1" will appear in the Data
list in the Experiment Setup window.
- Click on the Table display to make it active. Click the "Statistics"
button on the left side of the display. The bottom part of the Table will
display Min (minimum), Max (maximum), Mean, and Std. Dev (standard deviation).
- Record the value of the "Max" (or vf) of the Velocity
(m/sec) for Run #1 in the Data Table.
ANALYZING THE DATA
- Calculate the kinetic energy of the cart. Click the "Calculator"
button in the Experiment Setup window to open the Experiment Calculator
window.
- In the formula area, type "0.5" and then click the multiplication
button.
- Type the value for the mass of your cart plus sensor (such as 0.83214
in the example), and click the multiplication button again.
- Click the "INPUT Menu" button. Select "Digital 1,
Velocity (v)" from the INPUT menu.
- Type "^2", which means to square the speed, after
"@.v", the symbol for "Digital 1, Velocity (v)".
- Type "Kinetic Energy" in the Calculation Name area.
Type "KE" in the Short Name area. Type "J"
in the Units area.
- Click the "equal" button, or press <enter> or <return>
on the keyboard.
- Click the Table display. Click the "Add Plot Menu" button.
Select "Calculation, Kinetic Energy" from the Add Plot
Menu.
- Record the Max (maximum) value for KE (J) in the Data Table.
- Click the Graph to make it active. Click the "Statistics"
button to open the Statistics area of the graph. Click the "Autoscale"
button to rescale the graph to fit the data.
- Click the "Statistics Menu" button. Select "Integration"
from the Statistics Menu. The Science Workshop program integrates the area
between the X-axis and the curve of force versus position (distance).
- Record the value of the integration of force versus position as the
work (Newton*m) in the Data Table
DATA TABLE
| Item |
Value |
| Mass (cart & sensor) |
kg |
| vf (maximum) |
m/sec |
| KEmax |
J |
| Work (F vs d) |
Newton*m |
QUESTIONS
- What is the percent difference between the maximum kinetic energy and
the work done?
- What are possible reasons for any difference?
OPTIONAL
Measure the mass of the cart's mass bar. Add the bar to the accessory tray
of the cart. Repeat the data recording and analysis. Compare the maximum
kinetic energy and the work done.
![]()
![]()

