NOTE
This manual describes the laboratory experiment used during the 1996 - 1997 academic year. Significant changes have been made since then, and the manual used during the current academic year is in NOT available yet on the WEB. Hardcopies can be purchased at the bookstore.
To derive experimentally an expression for e/m, and to develop working knowledge of an oscilloscope.
This prelab homework must be done at home and handed to the lab TA before you start the lab. Read the instructions for this lab.
1) Derive Equation (8.5) for e/m.
2) For a 1% error in the orbit radius r, (equation 8.5), what is the percent error in e/m ?
3) For a 1% error in the product rxB, what is the percent error in e/m ?
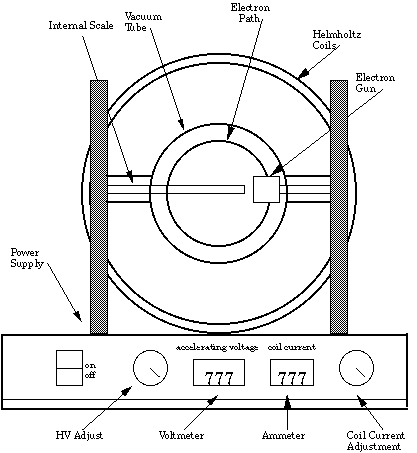
This self-contained apparatus designed for the measurement of the charge e to mass m ratio. e/m, of the electron by observing their circular paths under the influence of a uniform magnetic field B. The magnetic field is provided by a pair of Helmholtz coils surrounding the vacuum tube. The magnetic field is along the axis of the coils. The vacuum tube has a downward pointing electron gun in an evacuated tube that has a little helium added so that the path of the electrons in the tube is visible. The overall appearance of the apparatus is shown in Figure 8.1.
Three internal power supplies provide the filament power, the coil current and the accelerating potential for the electron beam. The filament supply is fixed while the accelerating voltage and the coil current are set by front panel controls. The accelerating potential and the coil current can be measured by two digital meters on the front panel. The meters make it simple to accurately determine the forces affecting the motion of the electrons within the tube. The diameter of the electron path in the magnetic field can be measured using the etched glass internal scale in the tube. The graduations and numerals of the scale are illuminated by the collision of the electrons, making observation and reading easier.
Figure 8.1
The helium gas added to the tube fluoresces when struck by the moving electrons and produces a bright, clear view of the electron beam. An electrode is provided for absorbing electrons after they have traced their circular path. Thus, the circular tracing of the electron path is undisturbed by previously emitted electrons, contributing to more accurate measurement.
The general configuration of the electron gun is shown in Figure 8.2. Electrons are emitted by an indirectly heated cathode at the top of the figure. The cathode is connected to the negative of the high voltage supply. It is partially shielded by a surrounding grid which has a small aperture to let some electrons pass through. The anode is mounted below the grid and is connected to the high voltage positive. Electrons escaping through the grid hole are rapidly accelerated toward the anode by the potential between them. Most of the electrons hit the anode, but some of them pass through the hole in the anode and form the electron beam in the tube.
The energy given to the electron falling through the potential V is eV, where V is the anode potential and e is the charge on the electron. All of this energy is converted into kinetic energy of the moving electron, mv2/2 (where v the electron's velocity and m is the mass),
![]() (8.1)
(8.1)
and
![]() (8.2)
(8.2)
As you have learned in the lecture part of this course, the electron beam is traveling in the transverse magnetic field B of the Helmholtz coils. It is deflected into a circular path by the Lorentz force, evB. This force provides the centripetal force, mv2/r required to maintain the circular motion. Equating these forces, you get,
![]() (8.3)
(8.3)
and therefore,
![]() (8.4)
(8.4)
From these two equations (equations 8.2 and 8.4) an expression for e/m can be derived,
![]() (8.5)
(8.5)
The magnetic field is provided by the Helmholtz coils surrounding the vacuum tube. They are mounted so that their field is transverse to the tube axis and the electron's motion. These coils produce a nearly uniform magnetic field everywhere inside of the volume they enclose. This is a very useful property, since it guarantees that there is a constant force on the moving electrons. In addition to field uniformity, the magnitude of the magnetic field can be calculated from,
![]() (8.6)
(8.6)
where ![]() [=
[= ![]() ] is the permeability of empty space, N is the number of
turns in each of the pair of coils(130 per coil), I is
the coil current and a is the coil radius(0.152m),
] is the permeability of empty space, N is the number of
turns in each of the pair of coils(130 per coil), I is
the coil current and a is the coil radius(0.152m),
![]() (8.7)
(8.7)
Your coil radius will be a little different from this value, so measure the dimensions carefully.
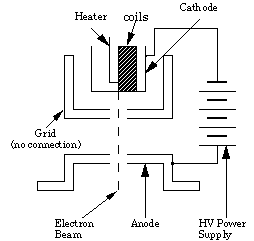
Figure 8.2
1) Set the apparatus on a level table. The room light should not be too bright, because the electron beam will be hard to see. You may want to use the "box" with the window.
2) In order to minimize the influence of geomagnetism, use a compass to locate magnetic North and align the Helmholtz coils axes so they are parallel to the needle. If this is not convenient, it can be disregarded with little effect on the results (certainly less than other errors in the measurement). This will have the effect of reducing the influence of geomagnetism on the magnetic field parallel to the coil axis. The influence of geomagnetism or other sources of magnetic fields can be observed by the deflection of the circular motion of the electron beam while the apparatus is rotated. The magnitude of this deflection is greater when a small current is flowing through the coils.
3) With the power switch off, connect the line cord to the correct line voltage power.
4) Turn on the power switch. The unit will perform a 30-second self-test, indicated by the digital display changing values rapidly. During the self-test, the controls are locked out, allowing the cathode to heat to the proper operating temperature. When the self-test is complete, the display will stabilize and show "000." Although the unit is now ready for operation, a 5-10 minute warm-up time is recommended before taking measurements.
5) Turn the Voltage Adjust control up to 200V and observe the bottom of the electron gun. The bluish beam will be traveling straight down to the envelope of the tube.
Note: Both the Voltage and Current outputs are controlled by an on-board microprocessor. Because the microprocessor automatically locks out the controls at both the minimum and maximum settings, there is no need to provide a manual "stop" on the knobs. When the knob reaches the maximum setting, it will still turn, although the value shown on the appropriate display will not change. These features prevent excessive loads being placed on the tube and provide a smooth, jitter-free display.
6) Turn the Current Adjust control up and observe the circular deflection of the beam. When the current is high enough, the beam will form a complete circle within the envelope. The diameter of the beam can be measured using the internal centimeter scale inside of the tube. The scale numbers fluoresce when struck by the electron beam.
7) For an accelerating voltage of 200V, measure the beam diameter for nine coil current settings.
8) Set the accelerating voltage to 300V, and repeat the measurements in Steps 6) -7).
9) Repeat Steps 6)- 7) for one additional accelerating voltage.
10) If a small ceramic magnet is available, move it close to the tube and observe the deflection of the beam. It is easy to see how properly designed magnets can be used to focus and steer an electron beam.
11) Reset both controls to zero and switch off the apparatus.
12) Measure the internal and external diameter of the Helmholtz coils on several axes. They may not be quite round and the two coils may not be quite the same.
13) Average your measurements and determine the standard error, so that you will be able to decide whether it has a significant effect on the accuracy of your results.
Note to TAs: If the electron gun is not pointed downward, the electron beam will travel on a spiral path. To correct this, loosen the mounting screws of the vacuum tube and rotate the tube a little until the electron gun is in the proper orientation and the beam is circular. This adjustment should be done by a laboratory technician before the laboratory session and not left to the student.
From Equation (8.5) it can be seen that the product of the electron path radius times the value of the magnetic field, should be constant for a single setting of the accelerating voltage V. From this average value, the value of e/m can be calculated. Typical results are given in Chart 8.1 for seven measurements at one value of the accelerating voltage (300V).
| N | Coil Current(A) | Magnetic Field(T) | Diameter(m) | Radius(m) | |
| 1. | 2.9A | 0.05m | 0.025m | ||
| 2. | 2.4A | 0.06m | 0.03m | ||
| 3. | 2.1A | 0.07m | 0.035m | ||
| 4. | 1.8A | 0.08m | 0.04m | ||
| 5. | 1.6A | 0.09m | 0.045m | ||
| 6. | 1.4A | 0.10m | 0.05m | ||
| 7. | 1.3A | 0.11m | 0.055m |
Chart 8.1
Mean Value of rxB
![]() =
= ![]()
True Standard Deviation of rxB (see appendix on Error Analysis)
![]()
![]()
= ![]()
![]()
= ![]() (error for a single
measurement)
(error for a single
measurement)
Standard Error of Mean of ![]() (see
appendix on Error Analysis)
(see
appendix on Error Analysis)
![]() =
= ![]()
Using equation (8.5) we find for this example:
![]()
![]()
Random Error for this example:
![]()
= ![]()
Your results will be different from those in this example. Analyze your measurements at 300 volts in a way similar to the example.
Similar calculations should be made for the other accelerating voltages . An analysis of the random errors in the experiment for each accelerating voltage should be made so the accuracy of the final result can be estimated. In addition, the sources of systematic errors should be estimated and discussed. You may assume that the error in the calibration of the coil current and accelerating voltage can be neglected. Start by plotting the extracted three average values of e/m versus the three measurements of accelerating voltage. Are the three values consistent with being equal within the estimated random errors?
One of the oldest and best instruments for measuring time varying voltages is the oscilloscope. The object of this lab is to learn to use the oscilloscope. The heart of the instrument is the cathode ray tube. The cathode ray tube, or "CRT," is an evacuated glass tube that contains:
* An electron gun that emits, accelerates, and focuses a stream of electrons into a narrow beam.
* A deflecting system that steers the electron beam.
* A phosphor coating that emits light when hit by the beam. The phosphor coating is at the wide end, which is the visible screen or face of the tube. If the beam is stationary, you will see it as a small spot of light on the screen.
The vacuum inside the tube is good enough so that the electrons have only a small
chance of colliding with residual air molecules. The velocity
of the electron beam is determined by the accelerating voltage
![]() applied to the electron
emitter(the other electrodes are near zero volts). Why should
applied to the electron
emitter(the other electrodes are near zero volts). Why should
![]() be negative? The magnitude
of the accelerating voltage
be negative? The magnitude
of the accelerating voltage ![]() is in the range of 1 to 20 kV.
is in the range of 1 to 20 kV.
The CRT uses an "electrostatic" deflection
system; the deflection of the beam from the center line is caused
by the electric field between each pair of deflection plates.
In turn, each electric field can be controlled by applying a voltage
difference to a plate pair. The result is that the vertical (or
horizontal) position where the beam hits the screen is a good
indicator of what voltage difference ![]() is across the vertical(or horizontal) pair of plates. The deflection
of the electron beam can be changed very rapidly, so that
it is possible to observe and measure very fast changes in
is across the vertical(or horizontal) pair of plates. The deflection
of the electron beam can be changed very rapidly, so that
it is possible to observe and measure very fast changes in
![]() .
.
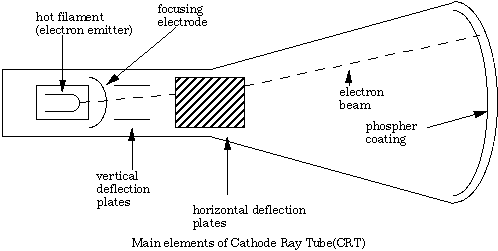
Figure 8.3
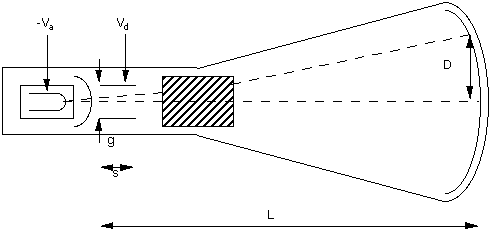
Dimensions and Voltages for a Cathode Ray Tube(CRT)
Figure 8.4
After leaving the deflection plates, the angle [theta]
of the trajectory is given by the ratio of the velocities vt
/ vi (see Figure 8.5). This is approximately related
to the total deflection by [theta] = D / L = vt / vi
(see Figure 8.6). The electron gun determines ![]() ,
and its magnitude can be calculated from energy conservation,
,
and its magnitude can be calculated from energy conservation,
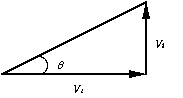
Figure 8.5
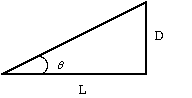
Figure 8.6
![]() (8.8)
(8.8)
The deflection plates determine ![]() ,
and provide a constant transverse acceleration
,
and provide a constant transverse acceleration ![]() ,
for a time t = s / vi, so that the transverse velocity
is,
,
for a time t = s / vi, so that the transverse velocity
is,
![]() (8.9)
(8.9)
and
![]() (8.10)
(8.10)
![]() (8.11)
(8.11)
Therefore, the deflection is approximately,
![]() (8.12)
(8.12)
The oscilloscope you will be using in the lab will be either the Tektro Mics 2213 or the 2225 version. The version described below is the Tektro Mics 2213 version, the function of the 2225 is essentially identical, but some of the knobs are slightly shifted.
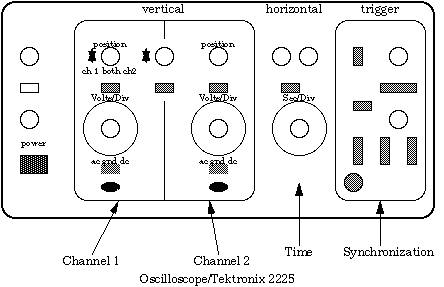
Figure 8.7
The oscilloscope, or "scope," is a general purpose instrument to measure voltages which vary rapidly in time. By applying time dependent voltages to both the horizontal and vertical deflector plates of the CRT, one moves the spot over the CRT face. If the spot moves slowly, one can see its progress. Usually the spot moves much too rapidly for our eye to follow, and all you see is a blur. This introduction to the use of the scope is limited; more information can be obtained by consulting the scope manual in the pocket on top of the scope. The oscilloscope will be an essential part of the next lab. It will be assumed that you are already familiar with how it operates.
CAUTION: The scope is a sophisticated and expensive piece of equipment. Handle it with care. Do not carry it around. Turn the knobs gently. Make sure the power cord is plugged in.
1) Push the POWER switch in. Pushing it in again will release it and turn the power off.
2) Turn the SEC/DIV. knob to 0.5 sec.
3) Set the TRIGGER SOURCE switch to LINE. Watch the spot moving. Rotate knob and watch the spot speeding up until it is a continuous trace. It may happen that you see nothing first. Pushing the BEAM FIND button will tell you if the beam is too high, too low, or off to one side. Another possibility is that neither the PUPATO or the NORM buttons are pushed in. Push in PUPATO. Now switch VERTICAL MODE switches to BOTH and ALT. You should see two traces, one for CH1 and one for CH2. Each can independently be moved up or down by the position knobs. So far you have not had any input.
4) Set VERTICAL MODE to CH1 and connect the WAVETEK output by a coaxial cable to CH1 input. Turn the WAVETEK on. You may see a blur or a patter. In order to get a clean picture, one has to use the TRIGGER. What you see on the scope is the WAVETEK output pulse shape (vertically) against time (horizontally). The speed with which the spot is moving horizontally is given by the SEC/DIV knob. There is a red CAL knob which should be turned all the way to the right. Vertically your scope is calibrated by the CH1 VOLTS/DIV knob, again with the red CAL knob all the way to the right. The TRIGGER setup enables you to see a repetitive pattern, always starting at the same point.
5) Push the PPAUTO button in, set LEVEL halfway, set SOURCE
to INT, and INT to CH1. Your pattern should now stabilize. If
it is still a blur, try rotating the LEVEL knob. Next vary the
frequency and amplitude of the WAVETEK generator; as well as the
shape of the output pulse: square wave, triangular wave and sine
wave. See how the various knobs affect what you see(red CAL knobs,
intensity, focus knobs, and the LEVEL knob). You will find that
in the PPAUTO mode the level knob has little effect, but the NORM
mode you can make the trace disappear when the LEVEL is set too
high; the horizontal "sweep" of the CRT spot then never
starts. The SLOPE button determines whether your trace starts
on a positive transition or a negative transition. If the red
knobs are not turned to the extreme right, the calibration
of the knob is wrong. For example, at the setting of
SEC/DIV at ![]() /division
the sweep will move that fast only if the corresponding CAL button
is to the right and pushed in.
/division
the sweep will move that fast only if the corresponding CAL button
is to the right and pushed in.
6) Next use the signal generators (WAVETEK or other) and connect one to CH1, the other to CH2. Set VERTICAL MODE to BOTH and ALT. Now the trace will alternatively show what comes in on Channel 1 and Channel 2. Study the effect of the TRIGGER settings. Note that you can always trigger on Channel 1 or Channel 2, or on whichever trace is next. Note that if the two frequencies are nearly exact multiples of each other the pattern will be (nearly) stationary even if triggered by the other channel. Why?
7) Next switch the SEC/DIV knob to X-Y. Now whatever appears on CH1 creates a horizontal movement of the spot, which CH2 controls the vertical. By varying the frequencies of the two generators you can create a wide variety of patterns, which are all figures traced by the function,
![]() (8.13)
(8.13)
![]() (8.14)
(8.14)
with ![]() and
and ![]() being controlled by two signal frequencies, and
being controlled by two signal frequencies, and ![]() usually slowly varying in time. These are called Lissajous patterns.
usually slowly varying in time. These are called Lissajous patterns.
1) Measure the frequency of the sine wave with the scope and compare this with the reading on the wave generators. Be careful of CAL knob positions. Do the same with the triangular and a square wave.
2) Measure the amplitude of a sine wave. Compare this to the Max 10V output of the Wavetek generator. Note that you can always check where "ground" is by flipping the switch under the corresponding VOLTS/DIV knob. Then check that you triangular wave and square waves really do go as positive as negative.
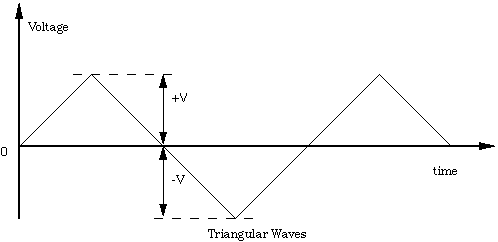
Figure 8.8
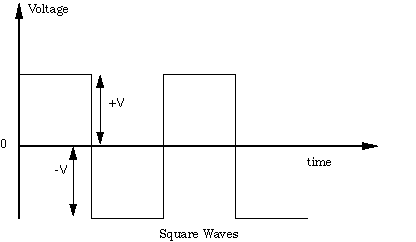
Figure 8.9