NOTE
This manual describes the laboratory experiment used during the 1996 - 1997 academic year. Significant changes have been made since then, and the manual used during the current academic year is in NOT available yet on the WEB. Hardcopies can be purchased at the bookstore.
To experimentally verify the laws of conservation of momentum and energy. In particular you will do:
The laws of conservation of energy and momentum are among the most fundamental and useful laws of physics. They aid in the solution of many mechanics problems and come up frequently in many fields of science. What these laws say is that if there are no net forces on a system, then that system will have the same momentum, p = mv, at all times. In addition, if there are no external or internal forces acting in or on a system, then the energy of that system will remain constant. Newton's First Law is hidden in these conservation laws. Newton's First Law states that bodies at rest will remain at rest as long as no forces act upon them, and bodies in motion will remain in motion as long as no forces act upon them. As one can see, Newton's First Law is a statement about conservation of momentum and energy. Things stay the same, as long as they are left alone.
Despite their fundamental nature, the conservation laws are often difficult to observe in ordinary experiences, primarily because of the presence of friction. Friction between moving bodies and their surroundings means there are external forces acting on the system, therefore, the conservation laws do not apply. So, to observe the conservation laws, friction must be eliminated as much as possible.
This lab will deal primarily with the conservation laws as they apply to collisions between material objects. These collisions can be divided into two different classes; elastic collisions and inelastic collisions. If the kinetic energy of a particle is the same before and after the collision, then the collision is said to be elastic. Notice the reference to particles. Solid bodies are not particles, but have structure. If the collision, however, leaves there structure unchanged, they can be treated as particles. For the other type of collision, energy will flow between the two objects, and the kinetic energy will not be conserved. In this case, the collision is said to be inelastic. Note that in the absence of friction, the momentum will be conserved in both types of collisions.
In one dimension, the conditions before and after an elastic collision between two bodies of masses m1 and m2, initial velocities v1i and v2i, and final velocities v1f and v2f, are given by
![]() (Kinetic Energy)
(Kinetic Energy)
![]() (Momentum)
(Momentum)
For an inelastic collision only the momentum equation is valid.
The prelab homework must be done at home and handed to the lab TA before you start the lab.
1) A small ball of mass m1 and velocity v1i has an elastic collision with a large, stationary object of mass m2. Show that the velocity v1f of the ball and v2f of the large object after the collision in terms of the two masses and v1i are
![]()
![]()
2) For the previous problem, show that the velocity of the ball is reversed after the collision if the stationary object is extremely large, m2 going to infinity. Indicate the limits of the velocities.
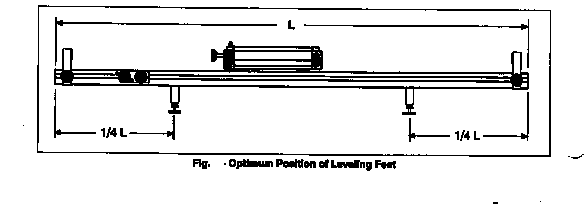
Fig. 1
For these experiments you will be using a track with carts that have very low friction wheels. The track setup with a cart used in the experiments is shown in figure 1. You will be able to measure the time intervals of a cart using the photo gate timers (see handout on photo gate timers), from which you can calculate the velocity of the cart. This is an electronic timer controlled by the interruption of an invisible infrared light beam when the cart passes the gate. If an object of length L interrupts the beam for a time interval t while passing through the gate, then the average velocity of the object during that time is given by
![]() (3.1)
(3.1)
This is the basic measurement you will make in this experiment. By measuring the velocity of the carts before and after various collisions, as well as weighing the carts, you will be able to calculate the energy and momentum and test the conservation laws.
For a complete description of the timers, see the handout.
There are several things that must be done in preparation for the experiments. Most importantly is to check if the track is level. Levels are provided for this purpose. Take one, and place it over the track's feet at one end of the track. First, place it along the length of the track and observe the level's "bubble". You want this bubble to be exactly in the middle. If it is not, adjust the feet of the track by turning the screws at the base of the feet. When the bubble is in the middle of the level, repeat this procedure at the opposite end of the track with the level again length wise. Once both ends have been adjusted, repeat this again at both ends with the level along the width of the track. Make sure that one of the end stops is on the right end of the track and the launcher is on the left side of the track (see Fig. 2). For a description of the launchers see the handout. To move the end stop and the launcher, loosen the screws on the side and slide them into position. Lastly, align the two photo gates equidistant from each other, making sure that the display is facing you. The track is equipped with a measuring tape so that distances can be measured. Place the first photo gate at 50cm from the launcher. Place the second photo gate at about 100cm from the launcher so that the two photo gates are about 50cm apart.
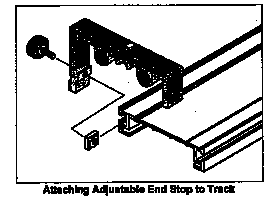
Fig. 2
Let us turn our attention to the carts. One end of the cart has a magnet inside and the other end has a plunger and Velcro strips labeled in figure as Hook-and-pile Pads (see fig. 3). You will use the plunger for elastic collisions and the Velcro for inelastic collisions. It might be the case that the Velcro will not stick together well. To test this, push the plunger in all the way on both carts. Put the two carts together by their Velcro ends. If they are not sticking well, you can roughen the Velcro by repeatedly putting the carts together and pulling them apart. Check that the carts have no irregularities by testing them on the track. Place each cart on the track, making sure that the wheels are in the grooves. Give each cart a small push and see how well it moves on the track. There should be minimal loss in velocity along the track. If there is noticeable loss in velocity, check the level of the track again. If that is fine, check the wheels of the cart and ask the TA for assistance.
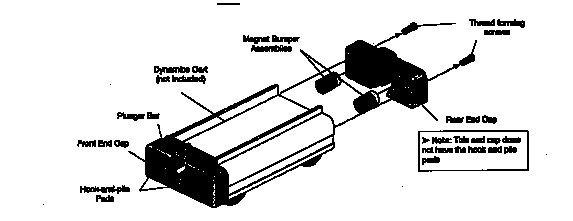
Fig. 3
The track will be used to create various collisions between the carts. The collisions will be arranged so that an initially moving cart will pass through a photo gate before hitting another object, so as to measure the initial velocity. After the collision, the cart will again pass through a photo gate so as to measure the final velocity. With these measured velocities, as well as the measured masses, the momentum and kinetic energy of the carts before and after the collisions can be calculated and compared.
Steps will be taken to deal with systematic errors in this experiment. The approximate effects of friction will be measured. Launchers are used so the initial conditions of consecutive trials can be reproduced.
The object of this experiment is to test Newton's First Law, which states that an object will remain in its state of motion so long as no forces act upon the object. In this case, a cart moving with no friction would not change its velocity as it moves along the track.
1) Place two of the rectangular masses on top of one of the carts. Place a cardboard strip between the two masses length wise so that it fits firmly.
2) You must measure the length of the cardboard and weigh the cart with the mass and the cardboard. Record these measurements.
3) Fix the height of the photo gates so that the beam is interrupted by the cardboard. Do this by bringing the cart up to each of the photo gates and adjusting the height of bracket so that it is the cardboard that sets the timer off. You can adjust the height of the photo gate by turning the screw on the post and moving the bracket up or down. Make sure you adjust both of the photo gates.
4) Adjust the cart launcher so the scale reads 3.2cm when it is cocked. You can adjust the compression by loosening the screw on the latching clamp and sliding it into position. Take one of the carts and bring it up to the launcher. Make sure the launcher is aimed at the center of the cart. Make sure that the cart's wheels are in the grooves of the track. Launch the cart by pulling the string on the launcher. Once it has passed through both of the photo gates, stop the cart and record the times displayed on the photo gates.
5) Repeat step 4 two more times for a total of three trials.
6) Repeat steps 4 and 5, this time with a friction block instead of the masses. Place a piece of cardboard into the groove on the friction block, (you might need two to fit tightly). Make sure you record the new mass of the cart.
For this experiment, you will create elastic collisions with the two carts. You will explore all the possible scenarios; two carts of the same mass colliding, a cart of lower mass colliding with a cart of a higher mass, a cart of a higher mass colliding with one of a lower mass, and a cart colliding with an infinite mass (the end stops). It is important that you set the launchers to the settings described. These settings demonstrate each scenario best.
1) Place one of the carts with two of the rectangular masses on it and the cardboard placed as before, between the two photo gates, about three quarters of the way to the second photo gate. Set the launcher to 3.5cm. Place the other cart with the friction block and the cardboard in position to be launched. Make sure that the carts' plungers are facing each other and that the plungers are all the way out.
2) Launch the cart toward the stationary cart that is in the middle. The cart will pass through the photo gate and repel off of the stationary cart. The two carts will then pass through their respective photo gates. Record the initial time that the cart took to pass through the photo gate and the time the carts took to pass through the gates after the collision. Remember that the time displayed in memory is the total time. You must subtract to get the actual second time.
3) Repeat this procedure two more times.
4) Repeat steps 1-3, but this time both carts should have the friction blocks on them so their masses are equal. Set the launcher to 2cm.
5) Repeat steps 1-3, but this time the cart that you launch should have the two masses and the cart in the middle should have the friction block. Adjust the launcher to 3cm.
6) Repeat steps 1-3 once again, but this time, use only one cart colliding with an end stop. Move the photo gates to the opposite end of the track spaced the same way. Slide the launcher to about 100cm from it's current position. Set the launcher to 3.5cm. Move the cart into position and launch it. Record the time displayed on both the photo gates before and after the collision.
This final collision experiment will deal with inelastic collisions. Repeat the procedure for part B, but this time the Velcro end of the carts should be facing front. In each collision, the carts should collide and stick together. When the carts pass through the photo gate together, the beam will be broken only when the cardboard passes through. This means there will be a space where the beam is not severed, so make sure you measure the length of the two cardboard pieces and not the length of the two carts.
You and your partner with a third person will repeat the experiment demonstrated by you TA. The instructions on how to do this experiment is in a hand-out which your TA will give to you.
The goal in all the trials is to compare the initial momentum of the carts with the final momentum, and likewise the initial kinetic energy to the final. This will be done by dividing the final value of the momentum by the initial, giving the fraction of the momentum that is conserved. If the conservation laws hold, this should be equal to one. Results less than one indicate that momentum was lost. In the same way, the fraction of kinetic energy that is conserved will be found.
Newton's First Law states that if there is no net force acting on an object, its momentum will not change. Use the data you have recorded to test this by calculating the fraction of the momentum conserved in each trial. Because there is only one cart, its mass and length factor out of this ratio, which will then be
![]() (3.2)
(3.2)
where ti and tf are the earlier and later time intervals, respectively. Kinetic energy should also be conserved. calculate the fraction that is conserved,
![]() (3.3)
(3.3)
The presence of any external forces, such as friction or gravity, will create a systematic error in all further measurements. To get a rough estimate of the effect this will have, calculate the average fraction of the initial energy and momentum lost for your data. To do this, first average all the momentum ratios and all the kinetic energy ratios calculated above, (to get the average fractions conserved), then subtract these results from one (to get the average fraction lost),
![]() (3.4)
(3.4)
![]() (3.5)
(3.5)
These results will be used in the error analysis.
Calculate the fraction of the momentum and kinetic energy that was conserved in all the collisions; that is calculate
![]() (3.5)
(3.5)
![]() (3.6)
(3.6)
Velocity and momentum have directions, so give them signs in your calculation (i.e. right is positive). You did three trials each, average these results.
Again, find the average fraction of momentum and energy conserved. In this case, v1f and v2f are the same (because the carts are joined together).
If the conservation laws are correct, it is still unreasonable to expect the fractions calculated to have values of exactly one, because of experimental errors. Errors in length and time measurements will have only a small effect on the results. The systematic error caused by friction Is more important. Once the losses are found, we will need to know how much can be attributed to friction before concluding the conservation laws were not followed. The losses due to friction were calculated for the trials in part A (with equation 3.4 and 3.5). Although this will not give the exact error due to friction, it should not be more than a few times larger. So, as long as the results differ from one by at most three or four times the losses found for part A, we can assume those differences are likely due to friction. Decide which conservation laws were verified in each part.
In this experiment, the velocity of a projectile as it leaves a spring gun will be measured using two methods. First, the conservation laws will be used in a somewhat subtle way to determine the velocity. For comparison, it will also be measured using projectile motion.
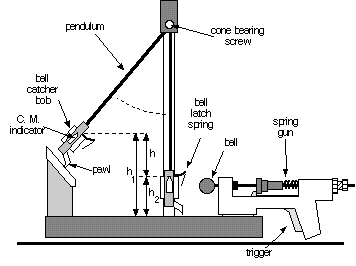
Figure 3.3
A ball is shot by a spring gun into a catcher arranged to swing as a pendulum (figure 3.3). When the ball is caught, the combination of the ball and catcher become the bob of the pendulum. Although the collision between ball and catcher is inelastic and energy is not conserved, momentum is. With the catcher at rest, the initial momentum of the system is provided by the ball, shot with velocity vb. Just after the ball is caught, the momentum that is due to motion of the center of mass of the pendulum assembled from the catcher and ball, having velocity vp . Conservation of momentum requires these be the same,
![]() (3.7)
(3.7)
where m and M are the masses of the ball and pendulum respectively.
After the ball is caught, the energy of the combined ball and catcher system is conserved. Initially the center of mass is at a height h1, with velocity vp. As it moves upwards against the force of gravity, the kinetic energy is converted into potential energy. A pawl mechanism latches it at its highest point, h2, where all the initial kinetic energy of the pendulum has been used to produce a change in the potential energy,
![]() (3.8)
(3.8)
which can be determined by measuring the increase in height h = h1 - h2 of the center of mass of the assembly. The value of the initial velocity of the ball is,
![]() (3.9)
(3.9)
Be sure your apparatus is firmly fastened down so it will not move during the experiment. Check to make sure the base is level and adjust if necessary. The ball mounts on the gun's push rod via a hole through its diameter. Make sure this fits smoothly on your apparatus. Make sure that the ball catcher is aligned with the spring gun.

Figure 3.4
1) Measure and record the weight of your ball. To remove the ball from the catcher, lift the latch spring with your finger while pushing out from the rear. The ball should come out easily. Do not bend the spring backwards, or it may break.
2) Weigh the pendulum. To do this, carefully unscrew the cone bearing screw until the pendulum is released. Replace the pendulum and tighten the cone bearing gently but firmly back in place.
3) To cock the gun, first rest the pendulum on the rack to get it out of the way. Then, with the ball in place on the rod, push on the ball until the trigger latches.
4) With the pendulum hanging freely measure the height of the Center of Mass (C.M.) indicator from the base.
5) Starting with the pendulum at rest, fire the ball into the catcher nine times (be careful not to get your hand caught in the gun when you fire it) and measure the height of the C.M. indicator from the base each time. It will not always be the same.
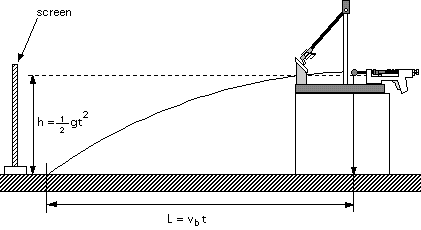
Figure 3.5
With the catcher removed from its path, the ball will fall freely after it leaves the gun. It will follow a parabolic arc until it hits the table top, traveling a horizontal distance L while falling a vertical distance h. The equations of projectile motion can be used to analyze the motion in these directions, as shown in figure 3.5. Combining the two equations to eliminate time, the initial velocity of the ball is then
![]() (3.10)
(3.10)
Make sure the apparatus is securely fastened and leveled on a block on the table. Latch the pendulum bob out of the way and practice firing the ball from the gun out over the table. Note where the ball lands. Be careful of wild shots.
1) Tape a piece of white paper over the area of the table top where the ball lands. Cover it with carbon paper, carbon side down, so that the impact point of the ball will produce a mark.
2) With the ball in place and the gun released, find the position on the table top directly below the center of the ball and mark it with a piece of tape.
3) Measure the height from the bottom of the ball to the table top.
4) Fire five shots, marking and numbering each of the impacts.
5) Measure the range L of each of these shots from your tape mark.
Calculate the average increase in height of the center of mass of the pendulum and its standard error (from the standard deviation of the measurements). Use this data to calculate the initial velocity of the ball and its error (see Appendix on Error Analysis). You may assume there is no error in the masses.
Calculate the average range L and its error [Delta]L from the standard deviation. Make a reasonable estimate of [Delta]h, the possible error in your height measurement. Calculate the initial velocity of the ball from the measurements of h and L. Calculate the error in the initial velocity [Delta]vb obtained with this method. The result from propagation of errors (see Appendix on Error Analysis) is
![]() (3.11)
(3.11)
Compare the results you obtained for the initial velocity of the ball by the two different methods. Are they consistent within your errors? Can you account for discrepancies?